09_SpringBoot_数据访问
使用1.x版本的SpringBoot
简介
对于数据访问层,无论是SQL还是NOSQL,SpringBoot默认采用整合SpringData的方式进行统一处理,添加大量自动配置,屏蔽了很多配置。
引入各种XxxTemplate,XxxRepository来简化我们对数据访问层的操作。
对于我们来说只需要简单的设置即可。
我们再数据访问这节测试使用SQL相关、NOSQL在缓存、消息、检索等节再做讲解
- JDBC
- MyBatis
- SpringData JPA
JDBC
整合JDBC与数据源步骤
- 引入starter
- spring-boot-starter-jdbc
- 配置application.yaml
- 测试
- 高级配置:使用Druid数据源
- 引入Druid
- 配置属性
- 配置Druid数据源监控
pom.xml
<dependencies>
    <dependency>
        <groupId>org.springframework.boot</groupId>
        <artifactId>spring-boot-starter-jdbc</artifactId>
    </dependency>
    <dependency>
        <groupId>org.springframework.boot</groupId>
        <artifactId>spring-boot-starter-web</artifactId>
    </dependency>

    <dependency>
        <groupId>mysql</groupId>
        <artifactId>mysql-connector-java</artifactId>
        <scope>runtime</scope>
    </dependency>
    <dependency>
        <groupId>org.springframework.boot</groupId>
        <artifactId>spring-boot-starter-test</artifactId>
        <scope>test</scope>
    </dependency>
</dependencies>
主要是引入了jdbc-starter和mysql驱动。
这次使用yaml配置文件:
spring:
  datasource:
    username: root
    password: root
    url: jdbc:mysql://ip:12389/jdbc?characterEncoding=utf8&useSSL=false
    driver-class-name: com.mysql.jdbc.Driver
测试是否成功:
@Autowired
DataSource dataSource;

@Test
public void contextLoads() throws SQLException {
    System.out.println(dataSource);
    System.out.println(dataSource.getClass());
    Connection conn = dataSource.getConnection();
    System.out.println(conn);
}
效果:
默认使用org.apache.tomcat.jdbc.pool.DataSource作为数据源;
数据源的配置都在DataSourceProperties里面
自动配置原理:
org.springframework.boot.autoconfigure.jdbc:
-
参考DataSourceConfiguration:根据配置创建数据源,可以看到,默认是使用apache的,如果配了其他的(HikariDataSource)就配置其他的数据源。用
spring.datasource.type指定自定义的数据源类型。 -
SpringBoot默认可以支持:
- org.apache.tomcat.jdbc.pool.DataSource:Tomcat的
- com.zaxxer.hikari.HikariDataSource
- org.apache.commons.dbcp.BasicDataSource
- org.apache.commons.dbcp2.BasicDataSource
-
自定义数据源类型:
/** * Generic DataSource configuration. */ @Configuration @ConditionalOnMissingBean(DataSource.class) @ConditionalOnProperty(name = "spring.datasource.type") static class Generic { @Bean public DataSource dataSource(DataSourceProperties properties) { // 使用DataSourceBuilder来创建数据源,利用反射创建相应type的数据源,并且绑定相关属性 return properties.initializeDataSourceBuilder().build(); } } -
DataSourceAutoConfiguration里有一个DataSourceInitializer,是一个ApplicationListener
作用:
-
/**
 * Bean to handle {@link DataSource} initialization by running {@literal schema-*.sql} on
 * {@link PostConstruct} and {@literal data-*.sql} SQL scripts on a
 * {@link DataSourceInitializedEvent}.
 */
可以帮我们运行schema-*.sql文件以及data-*.sql文件
-
runSchemaScripts();拿到数据源之后做的操作:运行建表语句,把建表的sql 放在指定位置就可以运行了。
-
runDataScripts();运行插入数据的sql语句;
-
默认只需要将文件命名为:
schema-*.sql和data-*.sql-
默认规则:schema.sql,schema-all.sql;
-
可以通过修改配置文件来指定schema的文件名(是个list类型)
spring:
  datasource:
    username: root
    password: root
    url: jdbc:mysql://IP:12389/jdbc?characterEncoding=utf8&useSSL=false
    driver-class-name: com.mysql.jdbc.Driver
    schema:
      - classpath:department.sql
      - classpath:employee.sql
-
-
操作数据库:JdbcTemplateAutoConfiguration:自动配置了JdbcTemplate操作数据库
@Controller
public class HelloController {

    @Autowired
    private JdbcTemplate template;

    @ResponseBody
    @GetMapping("/query")
    public Map<String,Object> map(){
        List<Map<String, Object>> list = template.queryForList("SELECT * FROM department");
        return list.get(0);
    }

}
-
整合druid数据源
引入maven依赖:
<dependency>
    <groupId>com.alibaba</groupId>
    <artifactId>druid</artifactId>
    <version>1.1.8</version>
</dependency>
然后切换到druid数据源:
修改application配置文件:
spring.datasource.type: com.alibaba.druid.pool.DruidDataSource
测试是否可以拿到druid连接:
@RunWith(SpringRunner.class)
@SpringBootTest
public class SpringBoot06DataJdbcApplicationTests {

    @Autowired
    DataSource dataSource;

    @Test
    public void contextLoads() throws SQLException {
        System.out.println(dataSource);
        System.out.println(dataSource.getClass());
        Connection conn = dataSource.getConnection();
        System.out.println(conn);
    }

}
输出:
{
	CreateTime:"2019-07-18 11:03:29",
	ActiveCount:0,
	PoolingCount:0,
	CreateCount:0,
	DestroyCount:0,
	CloseCount:0,
	ConnectCount:0,
	Connections:[
	]
}
class com.alibaba.druid.pool.DruidDataSource
2019-07-18 11:03:31.350  INFO 3976 --- [           main] com.alibaba.druid.pool.DruidDataSource   : {dataSource-1} inited
com.mysql.jdbc.JDBC4Connection@682bd3c4
可以看到class已经变成druid了
配置Druid相关信息(参数、监控器等)
application.yaml
spring:
  datasource:
    username: root
    password: root
    url: jdbc:mysql://tomxwd.top:12389/jdbc?characterEncoding=utf8&useSSL=false
    driver-class-name: com.mysql.jdbc.Driver
    type: com.alibaba.druid.pool.DruidDataSource
    # 下面是druid配置
    initial-size: 5
    min-idle: 5
    max-active: 20
    max-wait: 60000
    time-between-eviction-runs-millis: 60000
    min-evictable-idle-time-millis: 300000
    validation-query: SELECT 1 FROM DUAL
    test-while-idle: true
    test-on-borrow: false
    test-on-return: false
    use-disposable-connection-facade: true
    # 配置监控统计拦截的filters,去掉后监控页面sql无法统计,‘wall’用于防火墙
    filters: stat,wall,log4j
    maxPoolPreparedStatementPerConnectionSize: 20
    useGlobalDataSourceStat: true
    connectionProperties: druid.stat.mergeSql=true;druid.stat.slowSqlMillis=500
执行debug看DataSource的值,发现并没有起作用,原因是属性文件并没有对应起来,底层是通过反射来配置的,而spring并没有给druid适配,那么怎么解决呢,我们需要自己来配置数据源。
@Configuration
public class DruidConfig {

    @ConfigurationProperties(prefix = "spring.datasource")
    @Bean
    public DataSource dataSource(){
        return new DruidDataSource();
    }
}
打上@ConfigurationProperties(prefix = "spring.datasource"),表示这个bean的各个属性会去配置文件里找对应值。
再次debug会发现起作用了。
配置Druid的监控,即是之前讲过的注册Servlet操作,监控Filter也是同理:
StatViewServlet和WebStatFilter
初始化参数用map来传入到bean的InitParamter中即可起作用。
// 配置Druid的监控
// 1.配置一个管理后台的Servlet
@Bean
public ServletRegistrationBean statViewServlet(){
    ServletRegistrationBean servlet = new ServletRegistrationBean(new StatViewServlet(), "/druid/*");
    Map<String,String> initParams = new HashMap<>();
    initParams.put("loginUsername","admin");
    initParams.put("loginPassword","admin");
    initParams.put("allow","");// 不写或者为null 默认就允许所有访问
    initParams.put("deny","172.16.51.68");
    servlet.setInitParameters(initParams);
    return servlet;
}

// 2.配置一个监控的filter
@Bean
public FilterRegistrationBean webStatFilter(){
    FilterRegistrationBean filter = new FilterRegistrationBean();
    filter.setFilter(new WebStatFilter());

    Map<String,String> map = new HashMap<>();
    map.put("exclusions","*.js,*.css,/druid/*");

    filter.setInitParameters(map);
    filter.setUrlPatterns(Arrays.asList("/*"));
    return filter;
}
此时访问localhost:8080/druid即可进入监控台。
整合MyBatis
整合MyBatis步骤
- 引入mybatis-starter
- mybaits-spring-boot-starter
- 注解模式
- 配置文件模式
- 测试
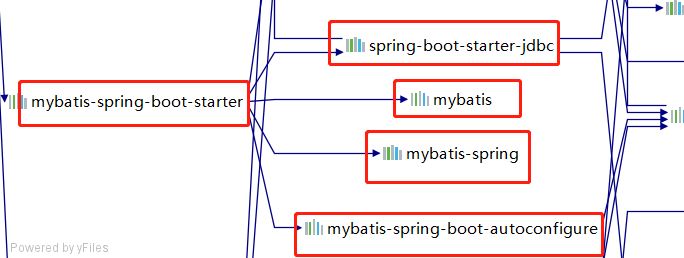
首先要引入Mybatis-starter的依赖
<dependency>
    <groupId>org.mybatis.spring.boot</groupId>
    <artifactId>mybatis-spring-boot-starter</artifactId>
    <version>1.3.4</version>
</dependency>
引入Druid数据源并配置:
Druid依赖:
<dependency>
    <groupId>com.alibaba</groupId>
    <artifactId>druid</artifactId>
    <version>1.1.8</version>
</dependency>
application.yaml:
spring:
  datasource:
    username: root
    password: root
    url: jdbc:mysql://tomxwd.top:12389/mybatis?characterEncoding=utf8&useSSL=false
    driver-class-name: com.mysql.jdbc.Driver
    type: com.alibaba.druid.pool.DruidDataSource
    # 下面是druid配置
    initial-size: 5
    min-idle: 5
    max-active: 20
    max-wait: 60000
    time-between-eviction-runs-millis: 60000
    min-evictable-idle-time-millis: 300000
    validation-query: SELECT 1 FROM DUAL
    test-while-idle: true
    test-on-borrow: false
    test-on-return: false
    use-disposable-connection-facade: true
    # 配置监控统计拦截的filters,去掉后监控页面sql无法统计,‘wall’用于防火墙
    filters: stat,wall,log4j
    maxPoolPreparedStatementPerConnectionSize: 20
    useGlobalDataSourceStat: true
    connectionProperties: druid.stat.mergeSql=true;druid.stat.slowSqlMillis=500
Druid配置(参数和监控等)
@Configuration
public class DruidConfig {

    @ConfigurationProperties(prefix = "spring.datasource")
    @Bean
    public DataSource dataSource(){
        return new DruidDataSource();
    }

    // 配置Druid的监控
    // 1.配置一个管理后台的Servlet
    @Bean
    public ServletRegistrationBean statViewServlet(){
        ServletRegistrationBean servlet = new ServletRegistrationBean(new StatViewServlet(), "/druid/*");
        Map<String,String> initParams = new HashMap<>();
        initParams.put("loginUsername","admin");
        initParams.put("loginPassword","admin");
        initParams.put("allow","");// 不写或者为null 默认就允许所有访问
        initParams.put("deny","172.16.51.68");
        servlet.setInitParameters(initParams);
        return servlet;
    }

    // 2.配置一个监控的filter
    @Bean
    public FilterRegistrationBean webStatFilter(){
        FilterRegistrationBean filter = new FilterRegistrationBean();
        filter.setFilter(new WebStatFilter());

        Map<String,String> map = new HashMap<>();
        map.put("exclusions","*.js,*.css,/druid/*");

        filter.setInitParameters(map);
        filter.setUrlPatterns(Arrays.asList("/*"));
        return filter;
    }


}
给数据库建表:
CREATE TABLE `employee` (
  `id` int(11) NOT NULL AUTO_INCREMENT,
  `lastName` varchar(255) COLLATE utf8mb4_unicode_ci DEFAULT NULL,
  `email` varchar(255) COLLATE utf8mb4_unicode_ci DEFAULT NULL,
  `gender` int(11) DEFAULT NULL,
  `d_id` int(11) DEFAULT NULL,
  PRIMARY KEY (`id`)
) ENGINE=InnoDB DEFAULT CHARSET=utf8mb4 COLLATE=utf8mb4_unicode_ci;

CREATE TABLE `department` (
  `id` int(11) NOT NULL AUTO_INCREMENT,
  `departmentName` varchar(255) COLLATE utf8mb4_unicode_ci DEFAULT NULL,
  PRIMARY KEY (`id`)
) ENGINE=InnoDB DEFAULT CHARSET=utf8mb4 COLLATE=utf8mb4_unicode_ci;
两个表:部门表和员工表;
建javaBean:
Department:
public class Department {

    private Integer id;
    private String departmentName;

    @Override
    public String toString() {
        return "Department{" +
                "id=" + id +
                ", departmentName='" + departmentName + '\'' +
                '}';
    }

    public Integer getId() {
        return id;
    }

    public void setId(Integer id) {
        this.id = id;
    }

    public String getDepartmentName() {
        return departmentName;
    }

    public void setDepartmentName(String departmentName) {
        this.departmentName = departmentName;
    }
}
Employee:
public class Employee {

    private Integer id;
    private String lastName;
    private String email;
    private Integer gender;

    @Override
    public String toString() {
        return "Employee{" +
                "id=" + id +
                ", lastName='" + lastName + '\'' +
                ", email='" + email + '\'' +
                ", gender=" + gender +
                ", dId=" + dId +
                '}';
    }

    public Integer getId() {
        return id;
    }

    public void setId(Integer id) {
        this.id = id;
    }

    public String getLastName() {
        return lastName;
    }

    public void setLastName(String lastName) {
        this.lastName = lastName;
    }

    public String getEmail() {
        return email;
    }

    public void setEmail(String email) {
        this.email = email;
    }

    public Integer getGender() {
        return gender;
    }

    public void setGender(Integer gender) {
        this.gender = gender;
    }

    public Integer getdId() {
        return dId;
    }

    public void setdId(Integer dId) {
        this.dId = dId;
    }

    private Integer dId;

}
接下来就是mybatis整合,分为注解版和和配置版两个部分:
注解版
如果要在插入的时候返回自增id需要加@Options属性:@Options(useGeneratedKeys = true,keyProperty = "id",keyColumn = "id")
// 指定这是一个操作数据库的Mapper
@Mapper
public interface DepartmentMapper {

    @Select("SELECT * FROM department WHERE id = #{id}")
    Department getDeptById(Integer id);

    @Delete("DELETE FROM department WHERE id=#{id}")
    int deleteDeptById(Integer id);
    @Options(useGeneratedKeys = true,keyProperty = "id",keyColumn = "id")
    @Insert({"INSERT INTO department (departmentName) values (#{departmentName})"})
    int insertDept(Department dept);

    @Update("UPDATE department set departmentName=#{departmentName} where id=#{id}")
    int updateDept(Department dept);

}
随便写个Controller进行注入mapper测试,发现都可以的,为什么不用进行相关配置?因为MybatisAutoConfiguration.java文件。
这个MybatisAutoConfiguration类在容器中给我们配好了SqlSessionFactory等。
思考一个问题:如果数据库字段改为department_name会怎么样?测试一下:
会报错的。
所以我们要开启驼峰命名法,怎么做:
发现ConfigurationCustomize,也是可以来自己定制的;
写一个mybatis配置文件类:
@org.springframework.context.annotation.Configuration
public class MyBatisConfig {

    @Bean
    public ConfigurationCustomizer configurationCustomizer(){
        ConfigurationCustomizer customizer = new ConfigurationCustomizer() {
            @Override
            public void customize(Configuration configuration) {
                // 开启驼峰命名规则
                configuration.setMapUnderscoreToCamelCase(true);
            }
        };
        return customizer;
    }

}
这个时候就开启了驼峰命名,重启项目,发现可以了。
那么,如果每一个Mapper都要自己去加@Mapper注解,显得太麻烦,而不加又不行,怎么办呢。我们可以用@MapperScan注解来标明Mapper扫描包。可以在任意一个配置类上加这个注解,但是最好在SpringBoot启动类或者mybatis配置类上加吧,规范。
@org.springframework.context.annotation.Configuration
@MapperScan(basePackages = {"top.tomxwd.mapper"})
public class MyBatisConfig {

    @Bean
    public ConfigurationCustomizer configurationCustomizer(){
        ConfigurationCustomizer customizer = new ConfigurationCustomizer() {
            @Override
            public void customize(Configuration configuration) {
                // 开启驼峰命名规则
                configuration.setMapUnderscoreToCamelCase(true);
            }
        };
        return customizer;
    }

}
配置版
创建一个新的Mapper
不管是配置版的还是注解版的,都需要用@Mapper或者@MapperScan将接口扫描装配到容器中;
// @Mapper或者@MapperScan将接口扫描装配到容器中
public interface EmployeeMapper {

    Employee getEmpById(Integer id);

    Integer insertEmp(Employee employee);

}
创建一个目录以及Mapper.xml文件。
而详细的配置到官网查看;
getting start里面开头有个全局配置文件:
<?xml version="1.0" encoding="UTF-8" ?>
<!DOCTYPE configuration
  PUBLIC "-//mybatis.org//DTD Config 3.0//EN"
  "http://mybatis.org/dtd/mybatis-3-config.dtd">
<configuration>
  <environments default="development">
    <environment id="development">
      <transactionManager type="JDBC"/>
      <dataSource type="POOLED">
        <property name="driver" value="${driver}"/>
        <property name="url" value="${url}"/>
        <property name="username" value="${username}"/>
        <property name="password" value="${password}"/>
      </dataSource>
    </environment>
  </environments>
  <mappers>
    <mapper resource="org/mybatis/example/BlogMapper.xml"/>
  </mappers>
</configuration>
内容不要,仅仅是复制过来看看。
翻到下面有sql映射文件的示例:
<?xml version="1.0" encoding="UTF-8" ?>
<!DOCTYPE mapper
  PUBLIC "-//mybatis.org//DTD Mapper 3.0//EN"
  "http://mybatis.org/dtd/mybatis-3-mapper.dtd">
<mapper namespace="org.mybatis.example.BlogMapper">
  <select id="selectBlog" resultType="Blog">
    select * from Blog where id = #{id}
  </select>
</mapper>
那么,修改命名空间以及内容:
<?xml version="1.0" encoding="UTF-8" ?>
<!DOCTYPE mapper
        PUBLIC "-//mybatis.org//DTD Mapper 3.0//EN"
        "http://mybatis.org/dtd/mybatis-3-mapper.dtd">
<mapper namespace="top.tomxwd.mapper.EmployeeMapper">

    <!--
        Employee getEmpById(Integer id);
        Integer insertEmp(Employee employee);
    -->
    <select id="getEmpById" resultType="top.tomxwd.bean.Employee">
        SELECT * FROM employee WHERE id=#{id}
    </select>

    <insert id="insertEmp">
        INSERT INTO employee(lastName,email,gender,d_id) VALUE (#{lastName},#{email},#{gender},#{dId})
    </insert>

</mapper>
这个时候还需要注意,mapper.xml并没有被扫描到,所以需要在application.yaml配置文件加上以下内容:
mybatis:
  config-location: classpath:mybatis/mybatis-config.xml
  mapper-locations: classpath:mybatis/mapper/*.xml
随便编写一个Controller测试一下,发现配置类做的驼峰命名规则无效了,因为配置文件里指定了mybatis-config.xml文件,优先级高,所以屏蔽了配置类的作用,要么就不要指定这个xml文件,要么就在xml文件里配置驼峰命名规则。
这时候再测试一下注解版的可以用不,发现可以,这样两种配置都可以混合使用了。
整合JPA
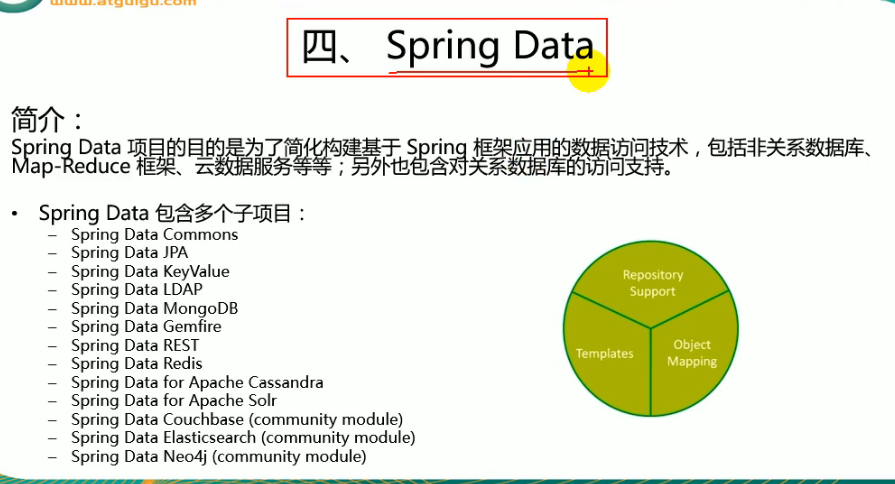
介绍一下SpringData
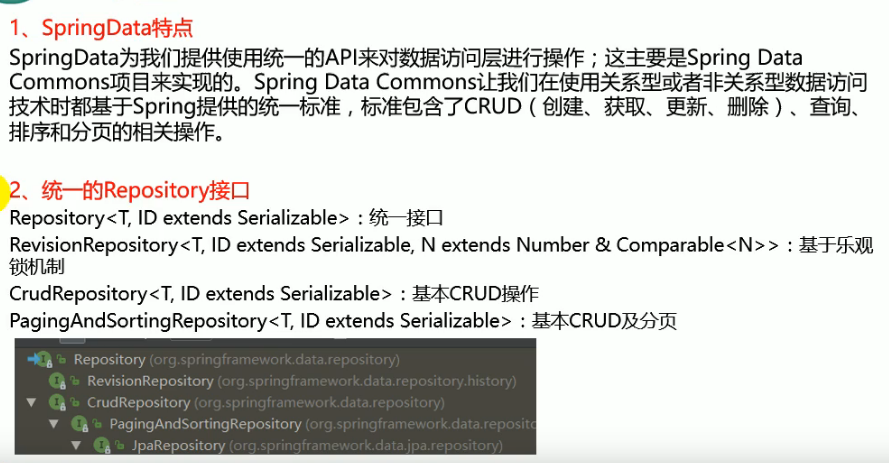
// TODO
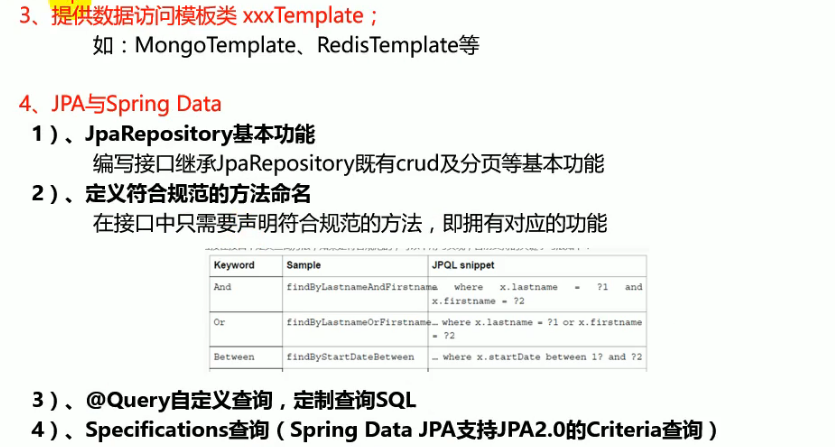
// TODO
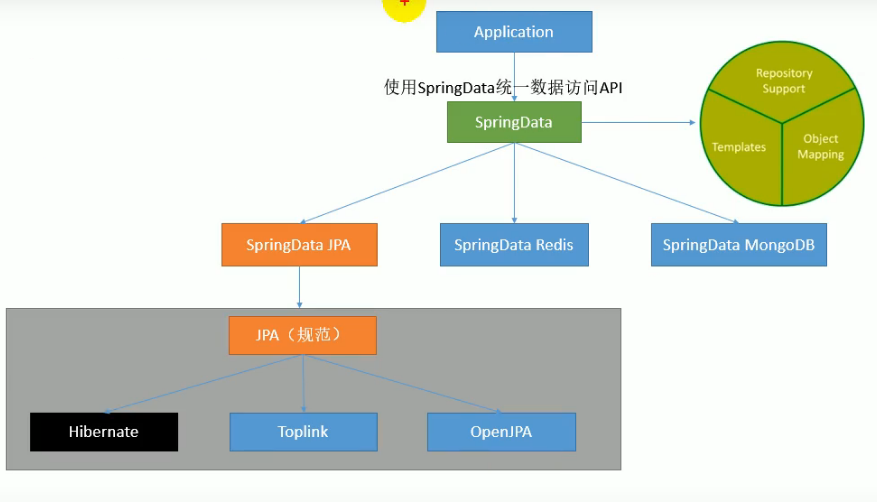
// TODO
JPA规范:JSR 317 JPA全名是Java Persistence API 顾名思义java持久层的接口规范
整合JPA步骤
- 引入spring-boot-starter-data-jpa
- 配置文件打印SQL语句
- 创建Entity标注JPA注解
- 创建Repository接口继承JpaRepository
- 测试方法
引入依赖pom.xml:
<dependencies>
    <dependency>
        <groupId>org.springframework.boot</groupId>
        <artifactId>spring-boot-starter-data-jpa</artifactId>
    </dependency>
    <dependency>
        <groupId>org.springframework.boot</groupId>
        <artifactId>spring-boot-starter-web</artifactId>
    </dependency>

    <dependency>
        <groupId>mysql</groupId>
        <artifactId>mysql-connector-java</artifactId>
        <scope>runtime</scope>
    </dependency>
    <dependency>
        <groupId>org.springframework.boot</groupId>
        <artifactId>spring-boot-starter-test</artifactId>
        <scope>test</scope>
    </dependency>
</dependencies>
查看依赖图,看到JPA其实底层就是用hibernate实现的。
配置数据源:
spring:
  datasource:
    url: jdbc:mysql://tomxwd.top:12389/jpa
    username: root
    password: root
    driver-class-name: com.mysql.jdbc.Driver
JPA:ORM(Object Relational Mapping);
-
编写一个实体类(entity)和数据表进行映射;并且配置好映射关系。
// 使用JPA注解配置映射关系 @Entity //@Entity告诉JPA这是一个实体类(和数据表映射的类) @Table(name="tbl_user") //@Table来指定和哪个数据表对应;如果省略,默认表名就是user public class User { @Id// @Id表示这是一个主键 @GeneratedValue(strategy = GenerationType.IDENTITY) // 自增主键 private Integer id; @Column(name="last_name",length = 50) // 这是和数据表对应的一个列,省略默认列名就是属性名 private String lastName; @Column(name="email") private String email; -
编写一个Dao接口来操作实体类对应的数据表(Repository)
// 继承JpaRepository来完成对数据库的操作 public interface UserRepository extends JpaRepository<User,Integer> { } -
修改主配置文件application.yaml
spring:
  datasource:
    url: jdbc:mysql://ip:12389/jpa?characterEncoding=utf8&useSSL=false
    username: root
    password: root
    driver-class-name: com.mysql.jdbc.Driver
  jpa:
    hibernate:
#      更新或者创建数据表结构
      ddl-auto: update
#      每次增删改查的时候输出sql语句
    show-sql: true
可以根据实体类自动生成表结构,以及输出sql语句。
-
运行项目,会发现数据库创建了tbl_user表。
-
写一个controller来测试一下:
@RestController
public class UserController {

    @Autowired
    private UserRepository repository;

    @GetMapping("/user/{id}")
    public User getUser(@PathVariable("id") Integer id){
        User user = repository.findOne(id);
        return user;
    }

    @GetMapping("/user")
    public User insertUser(User user){
        User save = repository.save(user);
        return save;
    }


}
先insert再select,发现控制台会打印sql


评论区